


Our traditional German family recipe for Stollen
Ingredients for 2 Stollen - (Can be halved or doubled, tripled etc.) The pictures at the end of this recipe show my mum making Stollen a few years ago. She makes loads so don’t be intimidated by the size of her bowl / washing basket!!

- 1kg plain white flour
- 120g FRESH yeast (DO NOT use 120g dry yeast in this!! 40g fresh should equate to one 7g pack of dried yeast, so 21g of dried yeast if you only have dried)
- 250ml milk at body temperature
- 200g white sugar
- 15g salt
- 400g butter – clarify this and only use the fat (the whey is delicious added to beef stews which my mum and her family, and us too, always ate on or after Stollen baking day), wait for the fat to come back to room temp before adding it in step 3.
- 100g pork lard (this ain’t vegetarian)
- 600g Raisins, covered in boiling water then drained
- 200g candied lemon peel, finely diced
- 200g ground almonds
- 1-2 lemons, zested (use the zest only)
For the icing: more clarified butter, icing sugar, vanilla sugar (this is quite a German ingredient, it’s not really necessary but you could cover a scraped vanilla pod with some caster sugar for a few days and use that)
Tools
- A Stollen ring; alternatively aluminium foil and aluminium paper clips to hold it in place during the bake. My mum uses this and it works brilliantly.
- A small sieve for the icing sugar at the end.
Technique
1. Clarify the butter and only use the fat. Let it come back to room temperature while you carry on. Make sure your kitchen is nice and cosy warm.
2. Put the flour into a big bowl. In a separate pot, mix the warm milk and yeast (if you’re using dried yeast, check pack instructions about how to activate it) and then pour onto the flour and mix it all around a bit - this is not a kneading stage yet. Cover and leave to rise in a warm place without any draft air (!) for 30 mins.
3. Add the other ingredients and knead. This will be a bit of a workout!!
4. Once the ingredients gather into a ball / lump, leave covered in a warm place again for 45 mins. The dough is very enriched so it won’t rise loads.
5. While the dough is proving, make two makeshift Stollen ‘tins’ by folding a long piece of foil lengthways (fold it a few times until it’s about 8cm wide); you want it to be long enough to go round the Stollen once it’s on the baking tray, and also sturdy enough to keep it from spreading during the bake.
6. Preheat oven to 190-200 degrees Celsius, NO fan – yeasted dough doesn’t like drafts if you haven’t realised by now!
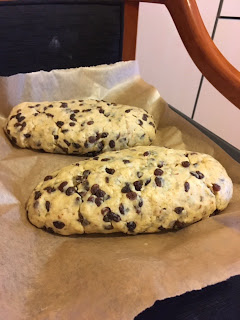
7. Divide the dough in two, tip one half out onto a lightly floured surface and shape into a Stollen shape (you’re aiming for an oval shape – the final piece is meant to represent baby Jesus wrapped in linen cloths!) with your hands. Put it on a baking sheet lined with baking paper. You might be able to put two Stollen on one baking tray if your oven is big, otherwise just bake one after the other. Score the Stollen down the middle, like you would do with a long bread loaf, about 1cm deep. This prevents random ripping during the bake. Poke any raisins into the stollen that are very prominent on the surface, otherwise they’ll burn. Loosely fit the aluminium sleeve around it - leave some space for the Stollen to spread. This sleeve will stop it from spreading too much while it bakes. Hold the sleeve in place with the heatproof paperclips.
8. Leave to prove as they are for another 15 mins, nice and warm. Then cover loosely with a sheet of foil and bake for around 60 minutes – after 45 mins remove the foil very quickly (oven door should only be open for a few seconds) before the final 15-20mins of the bake. It’s done when it’s a nice golden colour.
9. Take out of the oven, remove the foil ring and leave to cool as they are on the tray, otherwise they break. Once cool, you can move them on the baking paper and take any burnt raisins off – there’s always one or two, no matter how careful you were in step 7!
10. Once cool, brush liberally with melted clarified butter on the top and sides, and then dust even more liberally with icing sugar through a sieve. This is most easily done with two people- one holds the Stollen and slightly tilts it while the other one pushes the icing sugar through the sieve, so that all the sides get coated. Drip more melted butter over it, then repeat the icing sugar process and finally sprinkle over some vanilla sugar (this is definitely NOT diet food! But the icing is the best bit!!)
11. Wrap carefully in tin foil, a few layers will do, then keep somewhere cold (not the fridge, more a room you don’t heat much) for at least 2 weeks before cutting into it. We make this in early Advent and it keeps til February.
Let me know if you make it! It’s my great grandmother’s recipe, she learned how to cook and bake on a knights manor in Eastern Germany (how cool is that) in the early 20thcentury, so it’s probably a lot older than 100 years, we don’t know. When my mum was a girl, her family usually made about 15-20 Stollen at once, as did all their neighbours. Some were used as presents for relatives in West Germany and most were eaten from Christmas Day onwards - no one baked any cake in the winters, you just ate Stollen until it was all gone, sometimes this would be February or March! On Stollen day, my grandfather did all the kneading in a huge pot early in the morning and then carried it to the local bakery because no one had ovens big enough to cook them all! This also meant you could get a good look at everyone else’s dough that day and have a little nosey and gossip – the word “Schreistollen” (screaming stollen) was used to describe someone’s dough that had so few raisins in it that they’d have to scream to talk to each other!! My mum’s family would then collect the Stollen on long baker’s trays once baked, everyone including the kids helped carry them home for the buttering and icing. The baker would often give his verdict – the highest praise was when one year he said “I only added one half egg-shell full of milk to the dough (a HUGE pot of dough!!)” – no one’s dough was ever perfect in his eyes and he often adjusted flour or milk a bit before shaping and baking – but my grandmother’s dough from this recipe came pretty close to perfection in his eyes!! Lunch at home that day was Stollenkuchen, the leftover Stollen dough mixed with some potato rösti ingredients and fried in a pan. And the whey was used later to enrich “Stollen Goulash” , - a beef stew with the buttery whey added instead of water, which is actually one of my favourite food memories from my own childhood.
Pictures:
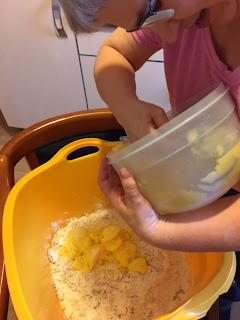
- Adding the clarified butter to the flour-yeast-milk mix
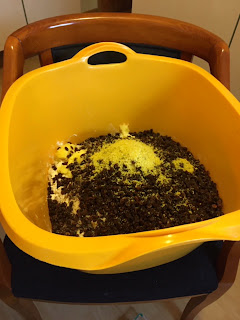
- Adding all the other ingredients on top, pre knead
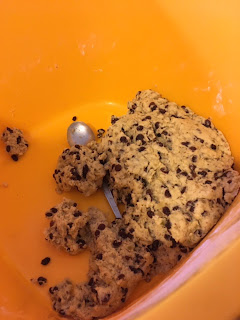
- After the knead, my mum had started shaping some Stollen by then. She makes way more than 2, hence the huge pot!
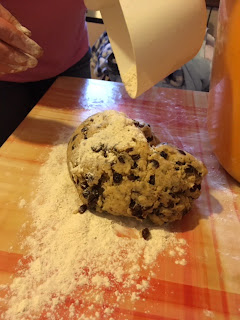
- Turning out for shaping
- Shaped and sitting on the baking tray
- Scored before baking sleeve is fitted, final prove and Stollen is baked
Picture 1 Picture 2
Picture 3 Picture 4

Picture 5 Picture 6
Reprinted by permission from Annie Crossman